...you disregard the docs saying 'this requires at least two people' and you
figure out a hacky way to make it possibly all by your lonesome - even though
you do have a friend or two who could have helped you. *sigh*
click here for the rest of the story...
following up on an earlier post, here are a few more reasons why 3d printers are both cool toys and useful tools.
i live in a pretty humid climate, and using vacuum storage bags (for things like spare blankets and pillows) is quite important; but the dyson vacuum that i inherited from my daughter has this nice-but-unhelpful clicky connector that sucks because it doesn't suck -- there's no flat interface that you can press against the bag valve.
so i spent a little time on designing and printing a sucker adapter (in PETG because i wanted to do more testing with the material).

or this one, from earlier this week: the built-in cupboard in my
hallway has a broken door catch (cylindrical post in the frame,
claspy catch on the door) and i couldn't find any even remotely
similar replacement at the (sole remaining :-( ) hardware chain.
however, calipers and persistence and one failed test-print later i've now got a parametric model and an actual replacement part that works.
on the last photo you can see my newest mod to my printer, a mk52 (clone) magnetic heatbed. the print surface is PEI on a removable sheet of spring steel, which is held to the actual bed and heater by many strong magnets. when your print is done you take off the steel sheet and flex that, rather than prodding and prying with spatula/chisel/knife.
so far it works pretty well, but the bed is made from PCB/fibreglass and prone to warping. i haven't fully bolted the bed down (like official prusa does it) because i like the ability to level things manually, but i may want to change that later; for now i've setup 7x7 grid level compensation with my smoothieboard clone and that takes care of the imperfect flatness.
i have lots of reasons!
click here for the rest of the story...
you might find this useful if you've got a 3d printer
or cnc setup with an mks sbase board (a cheap smoothieboard clone), and if
you want to add one of the typical cheap "LJ" inductive probes (for
levelling, homing, whatever).
click here for the rest of the story...
both my place's front and back doors have extra insect screen doors, a vital feature in this part of the world.
but almost every time i open it, the screen door flies open and bangs against the bricks. noise, scratches, ugly torquing of the flimsy hinges, clearly undesirable, and i was getting very sick of this.
(aside: when i bought the place it had automatic door closers on the screen doors, but these were far worse than the problem they attempted to solve so i took them off.)
so, what would az do? as usual i found a simple, quick, workable and cheap solution that makes creative use of stuff i had around.


cut 3cm of leftover pipe insulation foam (which i had bought for a purpose entirely unlike the official one...), slice longitudinally, contact-glue to the bricks, done.
now the door has an unobtrusiveand spongy 'soft' limiter and if and when it gets too gungy i'll just scrape off the glue and glue on a fresh bit of foam.
/me likes.
The wind station has gone through its
third and hopefully final R&D iteration, and I think now it's alright - but
it was a bit of an odyssey to get to this point.
click here for the rest of the story...
They are pretty cheap to buy, nowadays, but I prefer making my own if possible - that has the added benefit that I get to understand how it works (or why not).
The intertubes have linked to that diagram for ages, but that one doesn't work. The diode needs to be installed blocking the MAX's TTL output connection, not the input.
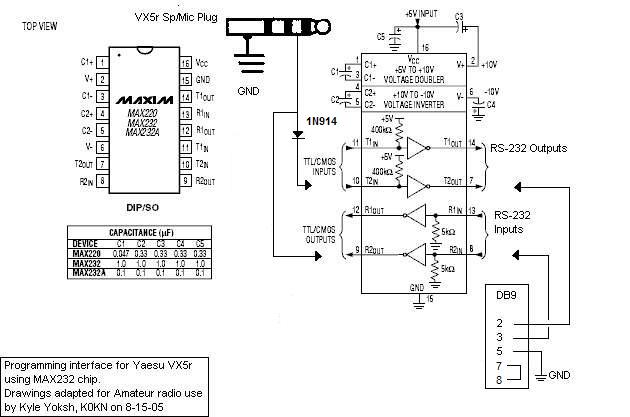
This is because the Yaesu radios use the Dallas 1-wire "bus" system, which works by holding the line level high when idle, and to transmit either of the two parties pulls the bus low (for different amounts of time to signal 0/1).
With the diagram as shown above the MAX's pull-up output overpowers the Yaesu's minimal current sink when it tries to pull low, so its transmissions go nowhere.
With the diode blocking against the TX pin, the Yaesu can pull the signal low to send and the MAX TX pin level is isolated. Transmitting to the Yaesu works because when the MAX pulls low, current flows across the diode and the Yaesu sees the low level. Slightly weird, but it works.
Here's the trivially simple Yaesu programming cable that I whipped up:
one FTDI breakout board (I have lots of MAX232s around, but dealing with the extra 5V power supply is less appealing than just using a cheapy usb-to-rs232 module), one diode and one dismantled 4-pin/TRRS plug.
CHIRP works fine with that cable and both my VX-5R and VX-7R.


I just finished rebuilding an Ikea Jansjö lamp into a portable camping lantern. It's not quite Luxo, Jr. but it'll do.


The Jansjö has a very long flexible neck, and to me that's the most essential aspect: it lets me have light on the table surface without having anything to suspend a lantern from. All the other common camping lanterns suck in that regard as they need to be suspended - or they produce lots of glare and no light on the table.
The Jansjö has one 3.5W white LED and needs 4V. I threw away the transformer and the concrete weight for the base, then glued the base to a plastic cylinder that once held 25 dvds - that has just the right diameter and has space for one adjustable LM2596-based step-down converter, and one set of repurposed laptop lithium cells (four in series).
Very simple, same XT60 plugs as all my other rechargable stuff, and packs up reasonably small.
This second post of this year is not about a hack but about a fairly nifty contraption that I just completed building.
In the local flying club we've had pretty bad experiences with our wind stations in the past. But with the lay of the valleys around our flying sites the local wind conditions often aren't even close to what the publicly accessible coastal stations report, so we really needed something to be done.
So I decided to build a new wind station for the club. Being a believer
in the KISS principle I wanted it to be simple and robust, and as self-contained
as possible: no grid power, no fixed-line Internet comms, no nothing.
As usual I'm presenting my experiences and code here for anybody interested
in building their own.
click here for the rest of the story...
- but of course not in the boring standard sense of the term: I like
repurposing stuff. Here are some examples.
click here for the rest of the story...
I've got these Ikea spice racks in my kitchen, and the way I installed them they needed to be fastened to the wall for stability. I didn't want to drill the tiles, however.
Once again my answer is "recycling": I habitually salvage the magnets from dead hard drives. The spice rack is coated steel, the magnets are pretty strong and so I simply glued a bunch of them onto the tiles. Silicone sealant makes a decent glue for operations like that, and it's removable if need be. Problem solved.


(with apologies to any non-Austrian readers for the utterly untranslatable title...)
Today we turned this:

into this:

and here's the story.
click here for the rest of the story...
but then that's maybe a good thing? Because Tron = pretty cool for 1982, but Tron Guy = doubleplusuncool, anytime.
Recently I bought some pretty cheap LED strips (5050-type, 60 LEDs/meter, flexible, waterproof and self-adhesive, can be cut every 5cm, cost $72 for ten meters) for overhauling the under-cabinet lighting in the kitchen. One old laptop PSU went into the range hood casing (displacing the trashy light sockets that thing had) and the left side is powered by a low-profile LED transformer. Mounting the stuff is a breeze: cut to size, cut and peel back a little of the silicon waterproofing, solder on wires, then peel off the backing paper and stick it in place, done.


I think it looks great - I'm pretty sure my sisters will say it looks like an abattoir... It's certainly very nice for working and it's also pretty frugal for the amount of light (about 2A at 12V on the left side, a bit less on the right).
What do you do with dead hard disks? I usually salvage the magnets; the larger ones make perfect holders for things like tools, knifes or mobiles.
Here's my ghetto mobile mount, mk.2: a 3x3cm piece of thin sheet metal sellotaped to the back of the phone and two fat ex-disk magnets screwed to the dashboard. Plenty strong, vibration-proof and completely invisible under the silicone phone cover. And, of course, zero cost.


About a year ago I bought an OpenBench Logic Sniffer, an open-source (both hardware and software) 32-channel 200Ms/s logic analyzer. Dirt cheap ($50) and very cool and useful, some software present in debian (sigrok) and the standard client (in java) isn't shabby, either. Of course it came without a case, and of course I couldn't leave it like that.
Here's where my genetic inheritance (a slight dose of pack rat) comes very handy: I don't throw things away lightly if I can see a likely future use for them. I very much like repurposing stuff in unexpected ways (eg. small bottle of nail polish remover plus pipette from the hair potion plus spade drill = small bottle with pipette for contact lens fluid when camping, or: dishwasher rinse aid bottle plus yet another pipette = oil can with applicator for lubricating the bicycle).
Because of this tinkering bias I really detest planned obsolescence and the thinly disguised downcycling spiral that we're sold as "recycling" all the time...and I'm extremely pleased whenever I find another elegant new (and unintended) use for something others call "disposable".
Hence I didn't buy a project box or case for the logic analyzer, but rather dug through my Box of Boxes, Bottles and Useful Plastic Things. I didn't have to dig deeply; after 5 minutes with a scalpel and the hot glue gun I had the OLS mounted in this perfect enclosure:

The box once held adhesive plaster strips and was simply way too useful to end up in the trash.
The analyzer itself has already proved to be a super-useful new member of my electronics tools toolche^Wzoo (other members: a Tektronix 2246 oscilloscope and a HP 3312A function generator).
The Tek is not a storage scope, so diagnosing complex and/or non-repeating signals is pretty much a no-go. But I needed just this kind of capability to fix yet another problem bugging me.
Some of you may remember this description of "dervish", the custom head unit I made for my bedroom music player, which provides an interface between a PC and an LCD module plus IR remote control reception via just one serial line (and a PIC, of course). The dervish is housed in a repurposed transparent floppy box, by the way :-).
The dervish had been whirling fine for the last three years, but suffered from occasional runaway phantom IR repeats that I couldn't track down. Two hours with a breadboard, an IR receiver module and the logic analyzer finally made me realize that the remote control I'm using doesn't follow the specs very closely, and really screws up the signal timing when the batteries run down. Another hour later I had tightened up the code for better rejection of dud signals and all is well again.

As I wrote earlier and long ago, the beauty of good 70s audio gear is that just about everything is done using discrete components only - which makes these beasts eminently repairable (if you have the service manual as I obviously do).
My Sanyo had developed a very bad left channel (not just crackling but bangs that threatened my speakers) and I figured it was a problem with the main amplifier, likely close to the power transistors.
The relevant NEC 2SB541/2SD388 transistors have of course become unobtainium long ago, but reading up on these in various transistor substitution documents I found that Motorola MJ21195/21196 are workable replacements (with somewhat better ratings). It cost me just $11 for two transistor pairs, $4 for new insulating/heat-conducting rubber pads and about half an hour including the offset/bias adjustment to revive the DCX. As far as I can tell the problem was the rotting, super-thin insulating material between the transistors and the heatsink, but I replaced the transistors nevertheless.
Good as gold again, and it may yet outlast me.
I don't get it why people pick an Arduino for their electronics projects: they're expensive, fat gadgets in all senses of the word fat: bootloader, IDE, board size, dev environment complexity...
A $5 PIC can do the same things and exposes you properly to what you're doing - preferrably in assembler, not C. Sure, large projects are better coded in C - later on, after you've mastered the low level; until then there's nothing better than assembler for learning how a computer works.
Here are some shots of the progress of the Wheely King towards a decent-strength bumper:


This 2008 version in metal didn't last a day (or more precisely the epoxy resin didn't hold it together long).


Shapelock is a pretty cool stuff: malleable from 60°C upwards and pretty strong when cooled down. This metal-plus-plastic bumper survived a good two years and quite a few rammings caused by a certain Kid Who Loves Full Throttle ;-) - but eventually the metal supports succumbed to said kid (the shapelock parts were still fine).


And this is the latest version: a bumper make from shapelock only, no more batteries high up but shortened packs low and on the side of the frame, a fully locked rear diff, a grease-and-blutack-LSD in front, and decent tires on beadlocks. Looks dud but it works pretty well now :-)
Last week I bought an ancient Stihl FS36 whipper-snipper to replace the bloody dead one. Four weeks after the cut my finger joint still hurts and won't straighten fully. The Stihl was in so-so shape, wouldn't start easily, but at $56...
So, me being me, the first thing (literally) that I did was take it apart. Completely, down to removing the piston ring from the piston.


click here for the rest of the story...
No electronics project of mine ever ends without me rerouting and resoldering at least two connections.
Why?
click here for the rest of the story...
I haven't got a clue, but I can tell you what I did.
click here for the rest of the story...
(Somewhat) apropos yesterday's article on tinkering: I wanted a simple setup to mount my Treo phone/pda in the car. None of the kludges for sale impressed me favourably, all being expensive/clunky/both or worse.
Being the Dismantler and Recycler Of Crap that I am, I have a few dead hard disks sitting around. Dead hard disk = two large and strong magnets, iff you manage to get them off their backing without breaking the brittle material. Sometimes I do manage, sometimes I don't.
So here's my ghetto mount: a fat magnet in heatshrink tubing, embedded in the back of a slab of coreflute which is stickytaped to the car dash. The Treo-side consists of a bit of thin sheet metal (was once part of a floppy drive housing) taped to the back of the treo with super-thin packing tape.


The hard disk magnet is easily strong enough to work through one layer of heatshrink, coreflute, the silicon glove and the packing tape. With the packing tape no irreversible mods to the Treo are necessary.
Simple, neat and zero-cost. I like that.
It's Conny's laptop and I'll paint if she wants that.
Actually, she does, and not surprisingly, I did. She wanted a skull and crossbones design and who am I to object to that Sound Sensible Choice :-)


I found a tiny image on the web and used that as an inspiration to come up with this design. Then I reused an old conference presentation slide and cut that for a mask, and went shopping for paint: fluoro pink.


The mask I fixed to the lapdog lid with spray glue (sprayed onto the mask, of course), and then I rattlecan-sprayed four layers: plastic primer, a thin coat of silver as a lightening base and two layers of pink.

Removed the mask, cleaned the glue residue off and neatened some of the spots where I had been too generous with the paint (raised edges). The stupid pink paint decided not to be very fluorescent (even with the silver base), but pink it is. Another coat of gloss enamel for the whole lid is forthcoming, but Conny is pleased with the result - and so am I.
I just saw a really interesting article, titled reflections on tinkering. Recommended.
The object of my repair efforts this time: a Coleman Instant Hot Water
system for camping. The product is nice, the company is lousy and
unwilling to sell any spare parts; but that kind of plot
does not work with me.
click here for the rest of the story...
I dislike throwing away repairable things. Like this old, very cheap but quite good knife (originally from Ikea): after more than a decade of daily use and the associated dunkings, the wooden handle had finally rotted away and split.
So I made a new grip: reused some wood reclaimed from a door frame, shaped it with my router, glued-and-screwed the grip halves on, sanded and lacquered the thing multiple times.

Why? Because I can, because it is fun to (re)make things and because a well-made thing gives me satisfaction.
My Wheely King RC toy was a tad fast for crawling over obstacles and also lacked torque and endurance with the stock motor and batteries. Simple fix: I cooked up a cheap brushless motor setup.
Ingredients:
- one cheap Chinese 2830 outrunner (850KV, 58g, 3.17mm shaft): $20 with shipping
- one fairly cheap Chinese/German ESC (speed controller) for brushless motors, $35 plus $15 shipping
- smaller pinion gears, 12, 13, 14, 16 and 17 teeth: $20 plus $10 postage
- some time for filing down the motor mount: dusty but free
Install the 14 tooth pinion. Mix and stir well. Season with absolutely incomprehensible Chinglish instructions for the ESC. Simmer on "Medium Angry" for a week. Find the German partner company who's responsible for the design of the ESC, and who has a manual in Real English. Turn off the heat, install, enjoy the slooooow speed at full blast. Up the pinion teeth, to 16. Reinstall, enjoy both the torque and fast-walking speed on full throttle.


Mounting the brushless dwarf was interesting, because it doesn't have the same screw pattern as the big 540-size original motor. It comes with a converter plate but using that the shaft is too short. So I made do with the smaller screw spacing. I simply filed away a fair bit of the motor mounting plate and then used a drilled steel washer as counter-piece for fastening the motor.
Getting the ESC to stop beeping and start working was almost as horrible as having to learn vi without a clue and a manual (ie. it beeps a lot but doesn't work, no matter what you do). Extremely frustrating. The thing being a very no-name non-brand, I even cut off the heatshrink to have a peek at the circuit board looking for manufacturer clues, but to no avail. Eventually and only because of a few really odd, happy circumstances I finally found out that it's one of these and got a working manual. Wohee, this actually works! I glued on an old heatsink block to the ESC's metal back plate and then closed it up again with transparent heatshrink tube. Looks neater than the original.

Overall the result is very pleasant. Torque is way up, this ESC has a proper brake (which the original didn't have) and with the tiny brushless motor (a powerhouse despite weighing only a measly 58g) I get very nice long run times even with the old original nicad battery. The reduced weight up top helps too.


As mentioned earlier and before I have
a Wheely King rc toy. Me being me, that WK is nowhere near stock and I often
delight in tinkering with it to make it work better or more fun or whatever.
click here for the rest of the story...
Not entirely unlike
a Kaplan turbine,
my mini-turbine is used in a high-flow, low-head(room) scenario. Only in
reverse, sort-of. Confused? Perfect, mission accomplished :-)
click here for the rest of the story...
click here for the rest of the story...