
The controller is a small but sophisticated microcontroller-based device. It is completely soft-configured via your radio transmitter. It does not need any manual intervention after the servo wires are plugged in (it has no servo trimming adjusters because it learns the proper neutral position on startup).
You can also bury the 4WSC deep in the guts of your vehicle because there's no need to see it: all necessary feedback is provided using its builtin piezo buzzer.
The 4WSC offers four steering modes to you:
You select the desired mode of operation with the extra channel on your radio. One of the benefits of the 4WSC is that any switch setup your radio might have will do! Two-position, three-position, analog or even a momentary push button will be fine with the 4WSC because it changes modes either based on the stick/switch position or cycles through them when your switch/stick changes.
Channel Sharing: People with a three-channel radio where the third channel is already used for some non-critical function should still be able to use the 4WSC in cyclic mode, if your function on channel three can take "short blips" without damage (e.g. a reversing transmission). See the Cyclic Mode explanation below for details.
For crawler competition use where you might not be allowed to have any tricks up your sleeve there is a lockout jumper on the controller which completely disables any mode switching and thus enforces front wheel steering strictly.
Your servo setup and personal preferences obviously affect how the 4WSC should do its job, and therefore it can be programmed/configured quickly and conveniently with your radio transmitter, without unplugging it or anything the like. The configuration options include items like whether your rear servo channel needs to be reversed or not, whether you prefer cyclic or direct mode switching and so on. The configuration is stored persistently in the controller's EEPROM memory and stays active until you reprogram the 4WSC (regardless of whether it's powered up or not).
You will need to mechanically straighten/balance rear and front servos: the 4WSC does not offer separate trimming of front and rear channels. Whatever trimming you do on your transmitter will be reflected on both channels in modes 1 and 4, or affect only the active channel (front in mode 2, rear in mode 3).
Consequentially the 4WSC uses only one neutral position which it will use for either channel in modes 2 and 3 (where it needs to create a neutral signal).
During this period, the 4WSC samples the neutral signal numerous times and the final value is then averaged over all the samples. (While calibrating the "reverse rear channel" config flag has no effect: the rear wheels may move the wrong way.)
After successful calibration you will get one long beep, then the 4WSC will show you the detected neutral on both channels for about 2 seconds.
If you have to make substantial trim adjustments on your transmitter you will likely need to restart the 4WSC afterwards so that it learns the proper position; if you don't, the neutral-locked servo in steering modes 2 and 3 may be off-center. (Modes 1 and 4 are not affected because the 4WSC doesn't have to create any neutral signals.)
If no valid signals are detected during the neutral calibration phase, the 4WSC will produce one horrible 4-second bleep and then switch off completely. You will need to switch it off and on again to clear that.
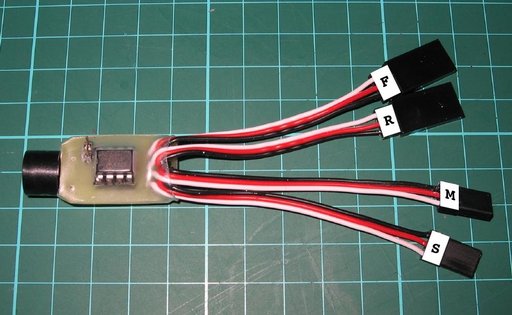
After the neutral calibration you're in control. Depending on your configuration choices the 4WSC will be in direct mode, cyclic mode or fixed 2WS-Front mode 2 if the lockout jumper is set (visible near the chip in the photo above).
The 4WSC supports two types of triggers:
You may have to limit your mode switching to when your vehicle is stationary depending on that other function...
You might not know which mode is selected, therefore the 4WSC will emit N blips when entering a mode. The normal sequence is 1-2-3-4-1... but you can disable either or both of modes 3 and 4 to shorten the cycle. The starting mode is always mode 1, 4WS.
Direct mode is a little bit more finicky with regard to your modeswitch channel. If you have only a pushbutton or two-position, non-centering switch, then you can reach only two modes directly. In that case you may prefer using cyclic mode.
If you have a three-position switch on the modeswitch channel, you still might have trouble reaching the mode corresponding to neutral if the trim is off very badly. The 4WSC is programmed with a fairly generous "deadband" around neutral but precise trimming certainly helps.
In this mode the mode switch channel is completely ignored and no mode switching is possible.
When powered up the 4WSC will beep once briefly and start initializing. If you provide it with a high signal on both channels (modeswitch at max or high, steering all the way one direction - which direction depends on your setup) IMMEDIATELY, it will enter programming mode and signal that with a series of eight short beeps.
The signal combo high+high is unlikely to happen by chance or inadvertently, but nevertheless should be producable by pretty much any radio setup that I can imagine. It is likely easiset to set that signal up first and then switch the 4WSC on. If you don't know which steering direction creates a high signal with your radio gear, simply try starting the 4WSC with either of them. The 8+1 beep pattern that indicates programming mode is quite distinct.
In programming mode, your steering servos are completely disabled and won't move by themselves. You will now be presented with a series of configuration items for your choice. You indicate your choice with the steering wheel, where a low signal means "no" and high means "yes". Your choice is confirmed when your modeswitch signal goes from high to low and the 4WSC tells you what choice it detected.
The number of the current config item is indicated by N long bleeps (about .5s each), and then you have as long as you want to make your choice. (There is a short delay after this item number indication where the 4WSC ignores modeswitch transitions; if you're very impatient and run into that delay, simply produce another modeswitch high-to-low transition.)
When you flip your modeswitch channel from high to low, the 4WSC will check your steering channel and then confirm your selection audibly: one short blip means you chose "no", two short blips means "yes".
This is followed by a pause of about 1 second and then the next config item is readied for your choice: you get N (item number) bleeps, you make your choice with the steering wheel, confirm and so on.
After the last config item has been covered, the 4WSC will update the persistently stored configuration. This means that if you switch the unit off before completing all config items your previous config will still be in effect (could be handy if you make a mistake).
When the new configuration has been written to EEPROM memory, the 4WSC starts permanently sounding blips (one every quarter second) and you will need to switch it off and on again for the new config to become active.
Here are the available config items:
Select "yes" if your servos are set up so that your car crabs sideways if you plug front and rear servos into a y-splitter cable (or in other words, if mode 1 gives you crab instead of 4WS). Select "no" if your car four-wheel-steers tightly in that situation.
Select "yes" if you want to cycle through the steering modes, one at at time, or "no" if you want the modeswitch position to indicate a mode directly.
Cyclic makes (up to) all four modes available but is more cumbersome, direct makes three available (only two if your modeswitch channel is non-centering) but is faster.
The answers for these two config items select one of four possible position-to-mode assignments for direct mode.
The following table shows the available steering mode combinations:
| Modeswitch | Q3 n, Q4 n | Q3 y, Q4 n | Q3 n, Q4 y | Q3 y, Q4 y |
|---|---|---|---|---|
| High | 4WS | 4WS | 4WS | 4WS |
| Neutral | Front | Rear | Crab | Front |
| Low | Rear | Front | Front | Crab |
You might not have any use for forklift-style steering.
Select "yes" if mode 3 should be part of the cyclic sequence. Select "no" to skip mode 3 completely.
Select "yes" if mode 4 should be part of the cyclic sequence. Select "no" to skip mode 4 completely.
A downside of the smaller PICs is that they need to be programmed with a special-purpose programmer interface, but you can either make one (not hard if you can solder at all) or buy one for about AU$15+.
The 4WSC circuit board was designed with in-circuit programming in mind, so the chip doesn't have to be removed. For in-circuit programming you need to connect the programming signals the following way:
$Id: manual.html,v 1.4 2010/04/29 13:58:38 az Exp $